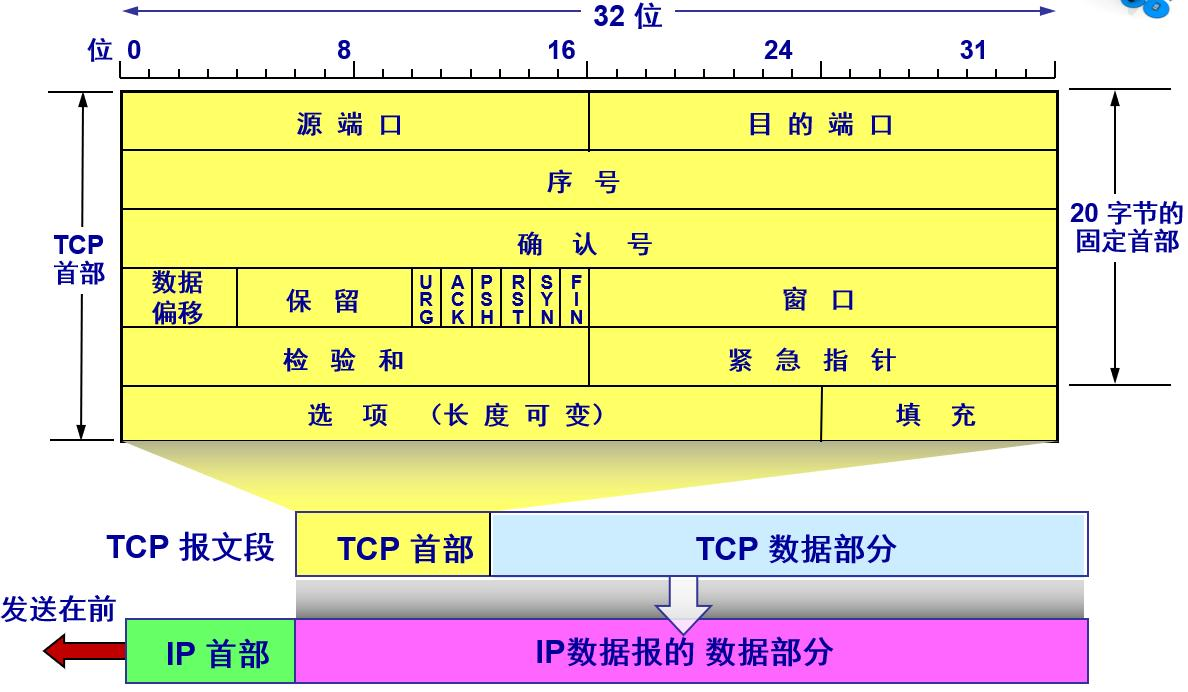
lab0 :warm up

第0张就是温习一下网络的相关知识。

1 Set up GNU/Linux

配置环境就直接跳过了,按照官方教程就行

2 Networking by hand

1
2
3
4
5
$ telnet cs144.keithw.org http
GET /hello HTTP/1.1
Host: cs144.keithw.org
Connection: close

终端输入上述代码

新建一个会话进行观察

1
2
3
$ netcat -v -l -n -p 9090
$ telnet localhost 9090

3 Writing webget

思路
实现 apps/webget.cc 中的 get_URL().
实现思路基本按照实验指导的提示和代码注释, 建立连接后发送 HTTP 请求报文. 然后打印回复报文的内容. 由于回复报文可能不止一个, 因此需要通过检查 EOF 标志位来判断是否接收完毕.


void get_URL(const string &host, const string &path) {
// Your code here.// You will need to connect to the “http” service on
// the computer whose name is in the “host” string,
// then request the URL path given in the “path” string.

// Then you'll need to print out everything the server sends back,
// (not just one call to read() -- everything) until you reach
// the "eof" (end of file).

// 直接参照tcp socks的api来哦发请求,使用address,还有
TCPSocket socks{};
socks.connect(Address(host,"http"));
// 发送api
socks.write("GET "+path+" HTTP/1.1\r\nHost: "+host+"\r\n\r\n");
socks.shutdown(SHUT_WR);
while(!socks.eof()){
    cout<<socks.read();
}
// 关闭管道
socks.close();
cerr << "Function called: get_URL(" << host << ", " << path << ").\n";
cerr << "Warning: get_URL() has not been implemented yet.\n";

}

4.in-memory reliable byte stream

任务二要求我们实现一个内存内的有序可靠字节流:

  • 字节流可以从写入端写入,并以相同的顺序,从读取端读取

  • 字节流是有限的,写者可以终止写入。而读者可以在读取到字节流末尾时,不再读取。

  • 字节流支持流量控制,以控制内存的使用。当所使用的缓冲区爆满时,将禁止写入操作。

  • 写入的字节流可能会很长,必须考虑到字节流大于缓冲区大小的情况。即便缓冲区只有1字节大小,所实现的程序也必须支持正常的写入读取操作。

  • 在单线程环境下执行,无需考虑多线程生产者-消费者模型下各类条件竞争问题。

image-20211105142904316

参照这张图,我们现在要实现的是bytestream,他的主要功能就是从队头取文件,队尾放文件。符合这个的数据结构是双端队列,dequeue。因此我们需要加入这个数据结构

下面,我们来看他需要实现的方法,还需要那些额外变量

1
2
3
4
5
6
7
8
9
10
11
12
13
14
15
16
17
18
19
20
21
22
23
24
25
26
27
28
29
30
31
32
33
34
35
36
37
38
39
40
41
42
43
44
45
46
47
48
49
50
51
52
53
54
55
56
57
58
59
60
61
62
public:
//! Construct a stream with room for `capacity` bytes.
ByteStream(const size_t capacity);

//! \name "Input" interface for the writer
//!@{

//! Write a string of bytes into the stream. Write as many
//! as will fit, and return how many were written.
//! \returns the number of bytes accepted into the stream
size_t write(const std::string &data);

//! \returns the number of additional bytes that the stream has space for
size_t remaining_capacity() const;

//! Signal that the byte stream has reached its ending
void end_input();

//! Indicate that the stream suffered an error.
void set_error() { _error = true; }
//!@}

//! \name "Output" interface for the reader
//!@{

//! Peek at next "len" bytes of the stream
//! \returns a string
std::string peek_output(const size_t len) const;

//! Remove bytes from the buffer
void pop_output(const size_t len);

//! Read (i.e., copy and then pop) the next "len" bytes of the stream
//! \returns a string
std::string read(const size_t len);

//! \returns `true` if the stream input has ended
bool input_ended() const;

//! \returns `true` if the stream has suffered an error
bool error() const { return _error; }

//! \returns the maximum amount that can currently be read from the stream
size_t buffer_size() const;

//! \returns `true` if the buffer is empty
bool buffer_empty() const;

//! \returns `true` if the output has reached the ending
bool eof() const;
//!@}

//! \name General accounting
//!@{

//! Total number of bytes written
size_t bytes_written() const;

//! Total number of bytes popped
size_t bytes_read() const;
//!@}
};

我们发现,bool还有size_t是需要进行返回的函数,因此加入 bool is_eof; size_t _capacity; size_t _written_size; size_t _read_size; 最后我们还要加上上面推理得到的数据结构双端队列deque deque _output;

1
2
3
4
5
6
7
8
9
10
11
12
13
14
15
class ByteStream {
private:
// Your code here -- add private members as necessary.

// Hint: This doesn't need to be a sophisticated data structure at
// all, but if any of your tests are taking longer than a second,
// that's a sign that you probably want to keep exploring
// different approaches.
size_t _capacity;
bool is_eof;
size_t _written_size;//当前已经写入了的
size_t _read_size;//当前已经写入了的

deque<char> _output;
bool _error{}; //!< Flag indicating that the stream suffered an error.

首先是实现构造函数,把上面新加入的变量全部初始化

ByteStream::ByteStream(const size_t capacity): _capacity(capacity),is_eof(false),_written_size(0),_read_size(0),_output() {}

接下来,我们把需要返回的,先进行返回

1
2
3
4
5
6
7
8
9
10
11
12
13
14
15
void ByteStream::end_input() {is_eof=true;}

bool ByteStream::input_ended() const { return is_eof; }

size_t ByteStream::buffer_size() const { return _output.size(); }

bool ByteStream::buffer_empty() const { return _output.size()==0; }

bool ByteStream::eof() const { return is_eof&&_output.empty(); }

size_t ByteStream::bytes_written() const { return _written_size; }

size_t ByteStream::bytes_read() const { return _read_size; }

size_t ByteStream::remaining_capacity() const { return _capacity-_output.size(); }
  1. 结束输入就是设置标识符eof为结束
  2. eof代表牌既不能输入,而且也不能读取,就是没有队列长度
  3. 剩余空间就是最先开始的长度-当前buffer占用的长度

接下来我们就是实现,双端队列的write

size_t ByteStream::write(const string &data) {

  1. 我们首先需要判断,还能不能写,不能写就返回
  2. 之后进行判断,当前能写的长度和data的长度,哪一个少,我们王少的写,同时写入长度增加
  3. 最后返回写入了多少长度
1
2
3
4
5
6
7
8
9
10
11
12
13
size_t ByteStream::write(const string &data) {
// DUMMY_CODE(data);
if (is_eof)
return 0;
size_t l1=data.size();
size_t l2=_capacity-_output.size();
size_t left =min(l1,l2);
for(size_t i=0;i<left;i++){
_written_size++;
_output.push_back(data[i]);
}
return left;
}

下一个函数peek_out和队列的输出后汉书一样,输出队头元素

  1. 判断最长能输出的长度
  2. 然后调用队列的输出pop,
1
2
3
4
5
6
7
8
9
10
11
12
string ByteStream::peek_output(const size_t len) const {
// DUMMY_CODE(len);
size_t l1=_output.size();
size_t l2=len;
size_t out_size=min(l1,l2);
string s;


return string(_output.begin(), _output.begin() +out_size);
}

下一个pop。和队列的pop一样,参照上面的,但是需要加入到已经读取了read_size

1
2
3
4
5
6
7
8
9
10
void ByteStream::pop_output(const size_t len) { 
size_t l1=_written_size;
size_t l2=len;
size_t out_size=min(l1,l2);
// _written_size-=out_size;
_read_size+=out_size;
for(size_t i=0;i<out_size;i++){
_output.pop_front();
}
}

现在我们要实现read代码,他的思路就是调用peek,还有pop就行

1
2
3
4
5
6
7
8
//! Read (i.e., copy and then pop) the next "len" bytes of the stream
//! \param[in] len bytes will be popped and returned
//! \returns a string
std::string ByteStream::read(const size_t len) {
string data=this->peek_output(len);
this->pop_output(len);
return data;
}

5 总结

总体来说第一个还是比较简单的,我们按照这个图发现,byte_stream是最底层的模块,他的作用就是退工读写队列,明白他是双端队列就好办了
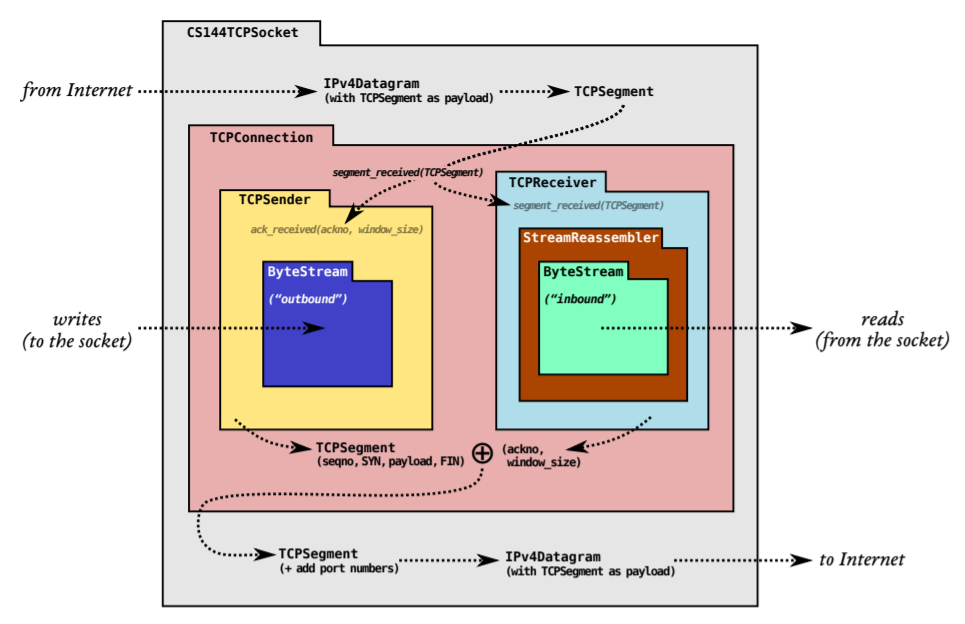
image-20211105142904316

明白了,这个,我们需要实现的就是write还有read功能,write写入到队尾,看剩余长度够不够,选择最小的进行写入。read也是选择最小的进行读取。思路和使用普通的队列差不多

lab1 :StreamReassembler

在我们所实现的流重组器中,有以下几种特性:

  • 接收子字符串。这些子字符串中包含了一串字节,以及该字符串在总的数据流中的第一个字节的索引

    流的每个字节都有自己唯一的索引,从零开始向上计数。

  • StreamReassembler 中存在一个 ByteStream 用于输出,当重组器知道了流的下一个字节,它就会将其写入至 ByteStream中。

需要注意的是,传入的子串中:

  • 子串之间可能相互重复,存在重叠部分

    但假设重叠部分数据完全重复。

    不存在某些 index 下的数据在某个子串中是一种数据,在另一个子串里又是另一种数据。

    重叠部分的处理最为麻烦。

  • 可能会传一些已经被装配了的数据

  • 如果 ByteStream 已满,则必须暂停装配,将未装配数据暂时保存起来

除了上面的要求以外,容量 Capacity 需要严格限制:
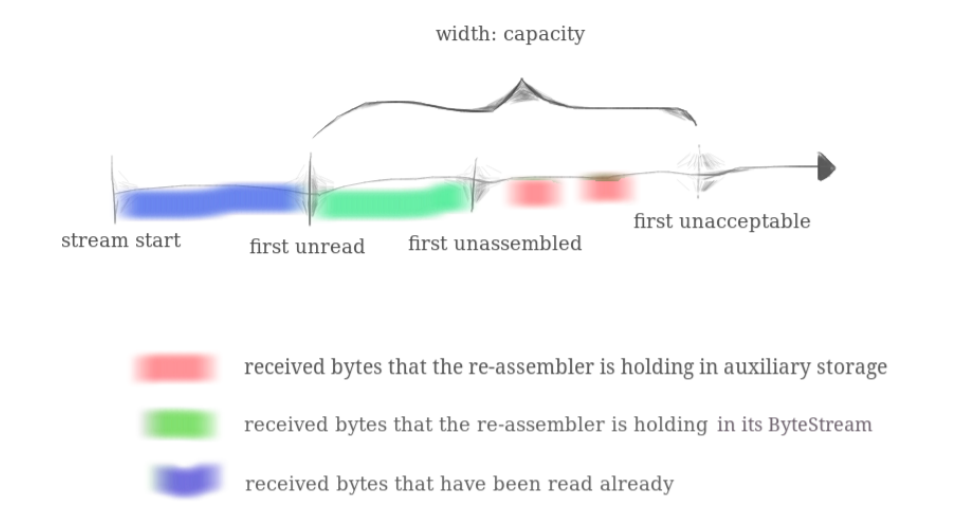
image-20211107124153476

为了便于说明,将图中的绿色区域称为 ByteStream,将图中存放红色区域的内存范围(即 first unassembled - first unacceptable)称为 Unassembled_strs。

CS144 要求将 ByteStream + Unassembled_strs 的内存占用总和限制在 Reassember 中构造函数传入的 capacity 大小。因此我们在构造 Reassembler 时,需要既将传入的 capacity 参数设置为 ByteStream的缓冲区大小上限,也将其设置为first unassembled - first unacceptable的范围大小,以避免极端情况下的内存使用。

思路:

  1. 这一个的任务是要求我们实现重组机器reassemble

  2. 主要功能包括对收到的字符串进行排序,之后传入到之前的byte_stream写入到缓存里面

  3. 根据上面的图,我们可以确定,绿色的是已经排序好了的,是在byte_tream里面的

  4. 绿色的+红色的是capacity,我们目前能放入到assemble的只有红色的

  5. 我们确定还没有排好序的为next_index,最大读取的就是next_index+(capacity-byte_stream。size)

  6. 同时在红色地区可能有元素,就是没有排序,我们使用unordered_map<int,char>来进行记录,下表的值,例如rec[100]=”c”这也是为了让byte_stream容易write

因此我们需要

根据上面的思路,我们来看api, void push_substring(const std::string &data, const uint64_t index, const bool eof);

  1. 需要我们把data放入到index的位置,并且设置eof
  2. 首先根据上面的分析,最长能够到达的是next_index+(capacity-byte_stream。size),如果大于等于,就说明超过了,直接return
  3. 接下来就是如果index+data.size()<=next_index+_output.remaining_capacity()&&eof表示写入完成,那么我们设置,stream_byte的is_eof为true
  4. 之后就是开始加载到reassemble的流程,和之前一样,data的前半部分可能已经被加载到重组器里面了,我们选择最大的开始,max(next_index,index),然后选择最小的长度,作为能放入到重组器的min(iondex+data.size,next_index+(capacity-byte_stream。size),作为读取的开始,然后我们放入到rec作为缓冲 注意(rec可能当前索引i已经有值了,这时候直接跳过

上半部分代码:

1
2
3
4
5
6
7
8
9
10
11
12
13
14
15
16
17
18
19
20
21
22
23
24
25
26
27
28
29
30
31
32
33
34
35
36
37
38
39
40
  // DUMMY_CODE(data, index, eof);
// 首先进行检索,看当前的index是不是超过
if(index>=next_index+_output.remaining_capacity()){
return;
// 直接结束,说明索引,已经超过剩下的buffer里面
}
if(eof&&index+data.size()<=next_index+_output.remaining_capacity()){
is_eof=true;
// 代表写入结束,next+out是写入
// output是之前那个byte
}
if(index+data.size()>next_index){
// 首先选最小的
for (size_t i=(index > next_index? index: next_index); i < next_index+ _output.remaining_capacity() && i < index + data.size(); i++)
{
/* code */
// 直接选择最小的,然后这是输入的
if (rec.count(i)==0){
//set里面没有这个,进行加入data
if (s.size()<=i)
{

/* code */
string add(i,'\0');
// s.reserve(2*i);
s+=add;
// cout<<s.capacity();
//扩容
}
s[i]=data[i-index];
//直接写入
rec.insert(i);
unassembled_bytes_++;
//这是没有整理的,放入到字符串里面
//

}


}

在已经写完了的情况下,我们就是对rec进行重拍程字符串,丢到stream_byte来进行写入,遍历next_index,看当前是不是有索引值,悠久进行加入,然后同事,构造一个新的字符串,直到next_index没有值,我们就不在进行while。结束之后,如果有eof标志,也要进行设置byte_stream为写入完成

1
2
3
4
5
6
7
8
9
10
11
12
13
14
15
16
17
18
19
20
21
22
23
24
25
26
    //写入结束,放入到output里面
size_t n=0;
size_t back=next_index;
while (rec.count(next_index)>0)
{
/* code */
n++;
rec.erase(next_index);
next_index++;
unassembled_bytes_--;
//这是已经写好了,然后进行减少

}
string x=s.substr(back,n);
// cout<<x;
_output.write(x);
//写入这个单词


}
if (is_eof && empty()) {
_output.end_input();
}
}

整体代码如下

1
2
3
4
5
6
7
8
9
10
11
12
13
14
15
16
17
18
19
20
21
22
23
24
25
26
27
28
29
30
31
32
33
34
35
36
37
38
39
40
41
42
43
44
45
46
47
48
49
50
51
52
53
54
55
56
57
58
59
60
61
62
63
64
65
66
void StreamReassembler::push_substring(const string &data, const size_t index, const bool eof) {
// DUMMY_CODE(data, index, eof);
// 首先进行检索,看当前的index是不是超过
if(index>=next_index+_output.remaining_capacity()){
return;
// 直接结束,说明索引,已经超过剩下的buffer里面
}
if(eof&&index+data.size()<=next_index+_output.remaining_capacity()){
is_eof=true;
// 代表写入结束,next+out是写入
// output是之前那个byte
}
if(index+data.size()>next_index){
// 首先选最小的
for (size_t i=(index > next_index? index: next_index); i < next_index+ _output.remaining_capacity() && i < index + data.size(); i++)
{
/* code */
// 直接选择最小的,然后这是输入的
if (rec.count(i)==0){
//set里面没有这个,进行加入data
if (s.size()<=i)
{
/* code */
string add(i,'\0');
// s.reserve(2*i);
s+=add;
// cout<<s.capacity();
//扩容
}
s[i]=data[i-index];
//直接写入
rec.insert(i);
unassembled_bytes_++;
//这是没有整理的,放入到字符串里面
//

}


}
//写入结束,放入到output里面
size_t n=0;
size_t back=next_index;
while (rec.count(next_index)>0)
{
/* code */
n++;
rec.erase(next_index);
next_index++;
unassembled_bytes_--;
//这是已经写好了,然后进行减少

}
string x=s.substr(back,n);
// cout<<x;
_output.write(x);
//写入这个单词


}
if (is_eof && empty()) {
_output.end_input();
}
}

剩下的我们,直接返回所需要的元素就行。设置那个重组器构造函数

1
2
3
4
5
6
7

StreamReassembler::StreamReassembler(const size_t capacity) : next_index(0),rec(),s(capacity,'\0'),is_eof(false),unassembled_bytes_(0),_output(capacity), _capacity(capacity) {}

//! \details This function accepts a substring (aka a segment) of bytes,
size_t StreamReassembler::unassembled_bytes() const { return unassembled_bytes_; }

bool StreamReassembler::empty() const { return unassembled_bytes_==0; }

总结

这一个的作业,主要是处理充排气,我们都知道tcp接受的时候,可能会先收到后发来的tcp分段,乱序到达,需要进行排列之后才能写入,所以这一届的任务就是实现重拍器实现tcp发送的一个任务。主要的难点就是完全理解这张图

image-20211107124153476

知道这个容量是byte_stream+还没有重组的,然后使用数据结构map,记录每一个位置的索引值

Lab 2: the TCP receiver

经典看不懂到底说的是什么

结合 Lab1 中实现的字节流重组器,可以发现,在数据的收发过程中存在几种序列号:

  • 序列号 seqno:32bit 无符号整数,从初始序列号 ISN 开始递增,SYN 和 FIN 各占一个编号,溢出之后从 0 开始接着数
  • 绝对序列号 absolute seqno:64bit 无符号整数,从 0 开始递增,0 对应 ISN,不会溢出
  • 字节流索引 stream index:64bit 无符号整数,从 0 开始递增,不考虑 SYN 报文段,所以 0 对应 ISN + 1,不会溢出

假设 ISN 为 232−2232−2,待传输的数据为 cat,那么三种编号的关系如下表所示:

img

由于 uint32_t 的数值范围为 0∼232−10∼232−1,所以 a 对应的报文段序列号溢出,又从 0 开始计数了。

处于安全性考虑,以及避免与之前的 TCP 报文混淆,TCP 需要让每个 seqno 都不可被猜测到,并且降低重复的可能性。因此 TCP seqno 不会从 0 开始,而是从一个 32 位随机数起步(称为初始序列号 ISN

16888898613871688889861341.png

思路:

  1. 首先实现序列号转绝对序列号,因为我们发送的是32位的seqno,但是接受之后,他会变成64位的,但是因为64位的位置更大,所以我们需要checkpoint,做为基准点,看他到底是哪一个
  2. 从64位转到32位,就容易点,根据上面的公式,进行移项,我们只需要abs+isn,强转到32位就行
1
2
3
4
5
//! Transform an "absolute" 64-bit sequence number (zero-indexed) into a WrappingInt32
//! \param n The input absolute 64-bit sequence number
//! \param isn The initial sequence number
WrappingInt32 wrap(uint64_t n, WrappingInt32 isn) { return WrappingInt32{isn + static_cast<uint32_t>(n)}; }

1
uint64_t unwrap(WrappingInt32 n, WrappingInt32 isn, uint64_t checkpoint) 

对于这个api,我们根据上面的分析是checkpoint是附近的值,来基于确认的我们知道(seqno之间的差距)一定等于abs之间的差距,所以我们可以先把chekpoint转到32来,计算他与n之间的差别,然后checkpoint与差值进行计算,因为是uint,所以一定大于0.如果小于0,需要加上2的32

1
2
3
4
5
6
7
8
9
uint64_t unwrap(WrappingInt32 n, WrappingInt32 isn, uint64_t checkpoint) {
// DUMMY_CODE(n, isn, checkpoint);
int32_t min_step = n - wrap(checkpoint, isn);
// 将步数加到checkpoint上
int64_t ret = checkpoint + min_step;
// 如果反着走的话要加2^32
return ret >= 0 ? static_cast<uint64_t>(ret) : ret + (1ul << 32);

}

TCPReceiver 实现img

要求

需要实现一些类成员函数

  • segment_received(): 该函数将会在每次获取到 TCP 报文时被调用。该函数需要完成:

    • 如果接收到了 SYN 包,则设置 ISN 编号。

      注意:SYN 和 FIN 包仍然可以携带用户数据并一同传输。同时,同一个数据包下既可以设置 SYN 标志也可以设置 FIN 标志

    • 将获取到的数据传入流重组器,并在接收到 FIN 包时终止数据传输。

  • ackno():返回接收方尚未获取到的第一个字节的字节索引。如果 ISN 暂未被设置,则返回空。

  • window_size():返回接收窗口的大小,即第一个未组装的字节索引第一个不可接受的字节索引之间的长度。

这是 CS144 对 TCP receiver 的期望执行流程:
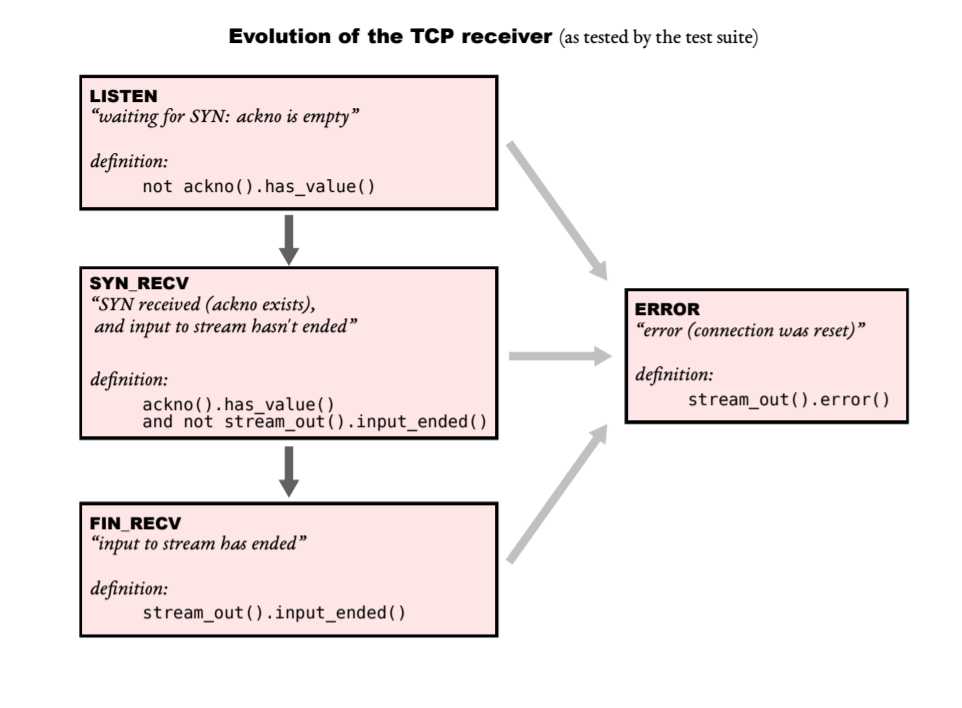
image-20211107122822566

第三个我们可以直接返回,因为我们在重组器就知道,这个串口就是容量-byte_stream的长度

1
2
size_t TCPReceiver::window_size() const { return _capacity-_reassembler.stream_out().buffer_size(); }

然后我们看这个api,**void TCPReceiver::segment_received(const TCPSegment &seg) **, 作用就是把收到的tcp片段,进行设置,如果我们自己没有syn,这个有,就设置他为isn,并且在把这个包传入到重组器里面。同时我们进行写入的是index,需要转换成64位(上文的unwarp),然后索引还需要-1,data是在seg的payload字段

1
2
3
4
5
6
7
8
9
10
11
12
13
14
15
16
17
18
19
20
21
22
void TCPReceiver::segment_received(const TCPSegment &seg) {
// 这个题目的意识就是要求我们把这个seg代码来进行写入到我们的接收器里面
// 首先没有isn,就直接失败
if(!_set_syn_flag){
if(!seg.header().syn)return;
// 没有开头直接就是失败
_set_syn_flag=true;
_isn=seg.header().seqno;
// 序列化在头文件里面
}
// 接下来我们就是来进行计算seq转化为绝对值,因为seq是32,所以需要我们上面的unwrap
// 得到相对值checkpoint
uint64_t checkpoint =_reassembler.stream_out().bytes_written()+1;
// 已经写入了的,作为相对值,这个是在stream里面的,已经排好序的,可以作为相对值
uint64_t convert_seq = unwrap(seg.header().seqno,_isn,checkpoint);

// 这个知识相对值,我们的stream index
// 要在上面进行减少1
auto stream_index = convert_seq -1 +(seg.header().syn);
// 接下来是写入,调用之前的代码
_reassembler.push_substring(seg.payload().copy(),stream_index,seg.header().fin);
}

我接下来,我们看 optional TCPReceiver::ackno() const,这个作用就是返回ackno,代表,下一次可以接受的位置,就是上一个实验的next_index位置,那么我们只需要把64位,转成32位,

1
2
3
4
5
6
7
8
9
10
11
12
13
optional<WrappingInt32> TCPReceiver::ackno() const {
// 返回ack
if(!_set_syn_flag){
return nullopt;
}
// 计算下一个,就是相当于之前的next——index,只需要求出
uint64_t abs_ack_no = _reassembler.stream_out().bytes_written() + 1;
// 如果当前处于 FIN_RECV 状态,则还需要加上 FIN 标志长度
if (_reassembler.stream_out().input_ended())
++abs_ack_no;
return WrappingInt32(_isn) + abs_ack_no;
}

总结

这一届的任务就是让我们知道接收器的作用。

  1. 接受分段,设置isn,然后交给重拍器进行处理
  2. 返回ackno,下一个需要对方发来的序列号
  3. 计算串口,能容纳多少,为了拥塞控制

lab 3 :TCPSender 实现

image-20211105142904316

我们已经实现了receiver部分,现在就是sende部分。

在该实验中,我们需要完成 TCPSender 的以下四个接口:

  • fill_window:TCPSender 从 ByteStream 中读取数据,并以 TCPSegement 的形式发送,尽可能地填充接收者的窗口。但每个TCP段的大小不得超过 TCPConfig::MAX PAYLOAD SIZE

    若接收方的 Windows size 为 0,则发送方将按照接收方 window size 为 1 的情况进行处理,持续发包。

    因为虽然此时发送方发送的数据包可能会被接收方拒绝,但接收方可以在反向发送 ack 包时,将自己最新的 window size 返回给发送者。否则若双方停止了通信,那么当接收方的 window size 变大后,发送方仍然无法得知接收方可接受的字节数量。

    若远程没有 ack 这个在 window size 为 0 的情况下发送的一字节数据包,那么发送者重传时不要将 RTO 乘2。这是因为将 RTO 双倍的目的是为了避免网络拥堵,但此时的数据包丢弃并不是因为网络拥堵的问题,而是远程放不下了。

  • ack_received:对接收方返回的 ackno 和 window size 进行处理。丢弃那些已经完全确认但仍然处于追踪队列的数据包。同时如果 window size 仍然存在空闲,则继续发包。

  • tick:该函数将会被调用以指示经过的时间长度。发送方可能需要重新发送一些超时且没有被确认的数据包。

  • send_empty_segment:生成并发送一个在 seq 空间中长度为 0正确设置 seqno 的 TCPSegment,这可让用户发送一个空的 ACK 段。

思路分析

我们首先拿最简单的trick进行分析,**void TCPSender::tick(const size_t ms_since_last_tick)**,这个函数的作用就是传入时间来进行模拟时钟,如果景观这些时间超过了定时器规定的时间,就需要进行重新发送文件,同事重启定时器。

为了使用方便,我们自定义一个定时器

1
2
3
4
5
6
7
8
9
10
11
12
13
14
15
16
17
18
19
20
21
22
23
24
25
class Timer {
private:
uint32_t _rto; // 超时时间
uint32_t _remain_time; // 剩余时间
bool _is_running; // 是否在运行

public:
Timer(uint32_t rto);

// 启动计时器
void start();

// 停止计时器
void stop();

// 是否超时
bool is_time_out();

// 设置过去了多少时间
void elapse(size_t eplased);

// 设置超时时间
void set_time_out(uint32_t duration);
};

剩余时间,规定的超时时间,还有是否开启的定时器,我们只需要一下几个函数,开启,关闭,是不是超时,设置rto时间,还有更新剩余时间。

对于trick这个函数,思路就是

  1. 首先更新定时器剩余时间,如果没有超过,就直接return
  2. 如果超过,再看待确认队列是不是空的,是空的,就初始化为最开始的rto,然后返回
  3. 不是,就需要进行重传,重新放入到sender的发送队列,并且更新rto,加倍红船时间(timer的设置时间函数)
  4. 最后打开定时器
1
2
3
4
5
6
7
8
9
10
11
12
13
14
15
16
17
18
19
void TCPSender::tick(const size_t ms_since_last_tick) { 
_timer.elapse(ms_since_last_tick);

if (!_timer.is_time_out())
return;

if (_outstand_segments.empty()) {
return _timer.set_time_out(_initial_retransmission_timeout);
}

// 超时需要重发第一个报文段,同时将超时时间翻倍
_segments_out.push(_outstand_segments.front().first);
if(_window_size>0){
_consecutive_retxs += 1;
_timer.set_time_out(_initial_retransmission_timeout * (1 << _consecutive_retxs));

}
_timer.start();
}

接下来就是返回能直接返回的,我们设置重传变量,到时候直接返回

1
unsigned int TCPSender::consecutive_retransmissions() const { return _outstand_bytes; }

返回没有被确认的字节数

1
uint64_t TCPSender::bytes_in_flight() const { return _outstand_bytes; }

img

image-20211107124153476

现在我们研究fill_windows这个函数,void TCPSender::fill_window(),函数的意识,就是让我们发送byte_stream里面的byte,这个就是发送代码。由于tcp是可靠传输,他有选择重传还有超时重传的机制,保证tcp发送seg能够被确认。因此这个ill_window的作用,就是进行发送seg。

整个作用就是

  1. 发送最大的长度seg,加入到待确认队列里面
  2. 如果还没有设置syn表示,就自己先发一个syn包
  3. 最后,如果是byte——stream已经发送完了,而且窗口还有剩余的,那就发送fin停止包
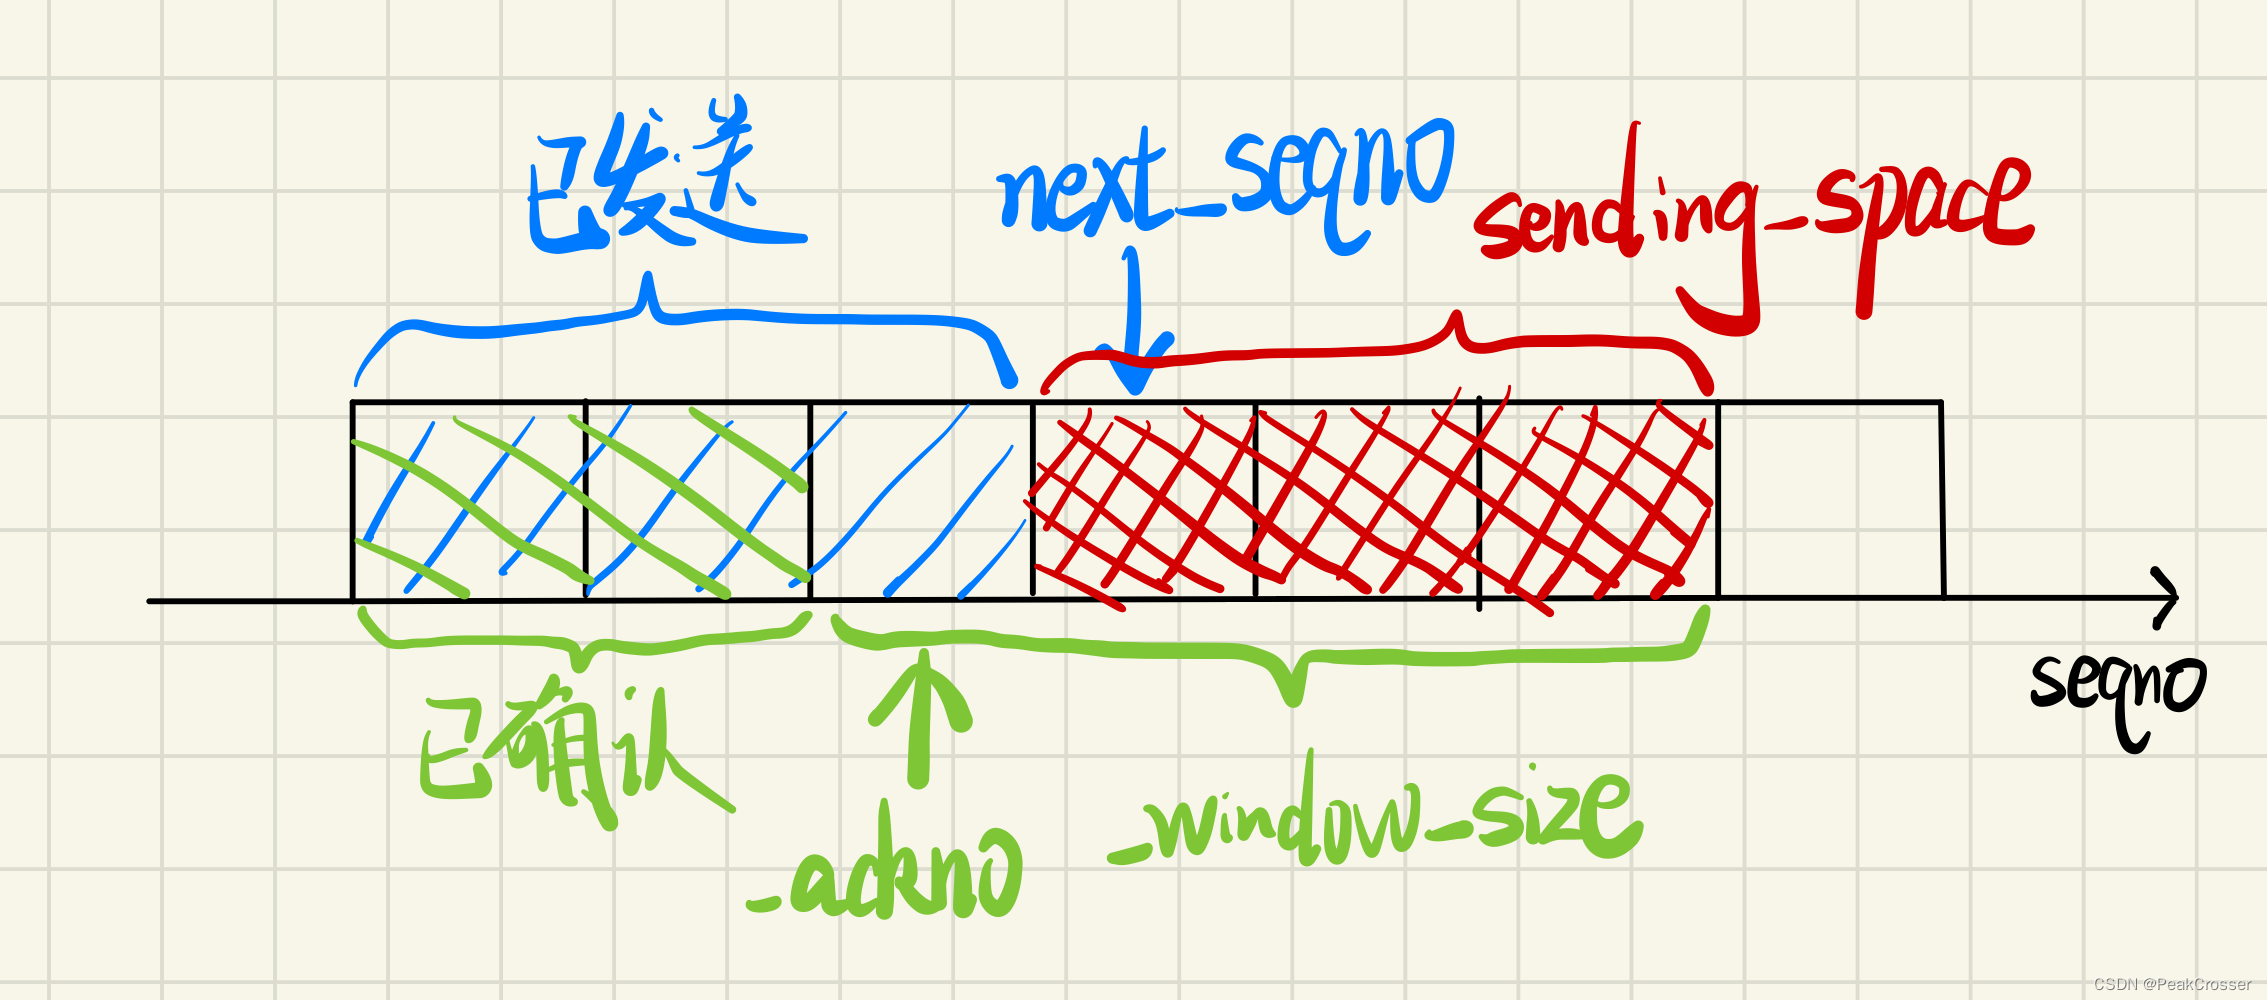
在这里插入图片描述

(注意)L:haishi需要按照上面这幅图来理解,ack代表已经进行确认的,next代表下一个序列号,那么我们最大能发送的max(_window_size, static_cast(1)) + _ack_seq - _next_seqno,ack只是没有进行确认,next是还没有进行发送的,这和上面接受的重组器差不多,ackno相当于第一个没有阅读的,next和上面的next一样都是第一个没有使用的。

  1. 如果当前还没有建立通信syn,而且等待队列也是空的,那么首先我发syn
  2. 如果不是,就首先计算,当前最大的剩余大小max(_window_size, static_cast(1)) + _ack_seq - _next_seqno
  3. 然后计算byte_stream能够发送的最大值,之后,剩余减去最大值,一直while
  4. 去除data,构建seg(我们自己实现了一个新的发送seg方法
  5. 之后如果把byte发送完了,但是窗口还有剩余,我们就发送fin结束包

发送代码

  1. 首先构造seg,之后进行设置他head,包括,syn,fin,还有序列号(这个直接用next——seqno)生成
  2. 放入到待确认的队列,更新待确认的byte的长度
1
2
3
4
5
6
7
8
9
10
11
12
13
14
15
16
17
void TCPSender::send_segment(string &&data, bool syn, bool fin) {
// 创建报文段
TCPSegment segment;
segment.header().syn = syn;
segment.header().fin = fin;
segment.header().seqno = next_seqno();
segment.payload() = std::move(data);

// 将报文段放到发送队列中
_segments_out.push(segment);
_outstand_segments.push({segment, _next_seqno});

// 更新序号
auto len = segment.length_in_sequence_space();
_outstand_bytes += len;
_next_seqno += len;
}

整体代码如下:

1
2
3
4
5
6
7
8
9
10
11
12
13
14
15
16
17
18
19
20
21
22
23
24
25
26
27
28
29
30
31
void TCPSender::fill_window() {
if (!_is_syned) {
// 等待 SYN 超时
if (!_outstand_segments.empty())
return;

// 发送一个 SYN 包
send_segment("", true,false);
} else {
size_t remain_size = max(_window_size, static_cast<uint16_t>(1)) + _ack_seq - _next_seqno;

// 当缓冲区中有待发送数据时就发送数据报文段
while (remain_size > 0 && !_stream.buffer_empty()) {
auto ws = min(min(remain_size, TCPConfig::MAX_PAYLOAD_SIZE), _stream.buffer_size());
remain_size -= ws;

string &&data = _stream.peek_output(ws);
_stream.pop_output(ws);

// 置位 FIN
_is_fin |= (_stream.eof() && !_is_fin && remain_size > 0);
send_segment(std::move(data), false, _is_fin);
}

// 缓冲区输入结束时发送 FIN(缓冲区为空时不会进入循环体,需要再次发送)
if (_stream.eof() && !_is_fin && remain_size > 0) {
_is_fin = true;
send_segment("", false, true);
}
}
}

这个代码就相当于是tcp里面的发送代码,建立绘画,并且把没有进行确认的seg放入到待确认的队列里面


下面我们来看 void TCPSender::ack_received(const WrappingInt32 ackno, const uint16_t window_size) 这个api

他传入的是返回号ackno,还有更新发送窗口的大小。这个就相当于得到ack号来进行确认之前传的文件是不是已经收到

  1. 如果当前ack号<=我自己的ackno,相当于返回的是没有,直接return
  2. 如果当前的ack,大于我要法的next_seqno,那也是没用
  3. 我们只要接受到ack号,就把拥塞控制回复到最开始,重传次数也变成0
  4. 之后就是累计确认
  5. 确认完成之后,我们再次进行发送使用fill_window
  6. 最后如果还有没有进行确认的,就需要我们进行使用打开计时器了
1
2
3
4
5
6
7
8
9
10
11
12
13
14
15
16
17
18
19
20
21
22
23
24
25
26
27
28
29
30
31
32
33
34
35
36
37
38
39
40
41
void TCPSender::ack_received(const WrappingInt32 ackno, const uint16_t window_size) { 

auto ack_seq = unwrap(ackno, _isn, _ack_seq);

// absolute ackno 不能落在窗口外
if (ack_seq > _next_seqno)
return ;

_window_size = window_size;

// 忽略已处理过的确认应答号
if (ack_seq <= _ack_seq)
return;

_ack_seq = ack_seq;
_is_syned = true;

// 重置超时时间为初始值
_timer.set_time_out(_initial_retransmission_timeout);
_consecutive_retxs = 0;

// 移除已被确认的报文段
while (!_outstand_segments.empty()) {
auto &[segment, seqno] = _outstand_segments.front();
if (seqno >= ack_seq)
break;

_outstand_bytes -= segment.length_in_sequence_space();
_outstand_segments.pop();
}

// 再次填满发送窗口
fill_window();

// 如果还有没被确认的报文段就重启计时器
if (!_outstand_segments.empty())
_timer.start();
else
_timer.stop();
}

这一部分主要是为了完成,ack发送器的确认,确认成功之后,我就接着再次发送,相当于tcp的三次握手,首先,是建立syn,没有收到syn,那就是我来进行发送,之后获取到ack,那么我们就代表建立成功,更新syn为true,同事更新本地ack为接收到的ack,然后累计确认已近收到了的seg,最后收到确认之后,sender还是需要进行发送,调用fill—windows,最后来进行设置计时器打开与关闭

总结

这一届需要我们实现的是tcp的发送端,我们需要完成发送byte里面的字段,然后放入到待确认的队列里面,根据会传来的ackno来进行累计确认还有更新,相当于实现tcp的三次握手阶段,我们需要进行发送的文件方法,然后使用累计确认,来确保tcp完整的连接。

lab4 tcp connection

投降了,这一个,直接抄的CS144计算机网络 Lab4 | Kiprey’s Blog,完全看不懂到底在说什么,不知所云,边界测试条件也是一堆,放弃了

TCPConnection 需要将 TCPSender 和 TCPReceiver 结合,实现成一个 TCP 终端,同时收发数据。

TCPConnection 有几个规则需要遵守:

对于接收数据段而言:

  • 如果接收到的数据包设置了 RST 标志,则将输入输出字节流全部设置为 错误 状态,并永久关闭 TCP 连接。

  • 如果没有收到 RST 标志,则将该数据包传达给 TCPReceiver 来处理,它将对数据包中的 seqno、SYN、payload、FIN 进行处理。

  • 如果接收到的数据包中设置了 ACK 标志,则向当前 TCPConnection它自己的 TCPSender 告知远程终端的 ackno 和 window_size。

    这一步相当重要,因为数据包在网络中以乱序形式发送,因此远程发送给本地的 ackno 存在滞后性。

    将远程的 ackno 和 window size 附加至发送数据中可以降低这种滞后性,提高 TCP 效率。

  • 如果接收到的 TCP 数据包包含了一个有效 seqno,则 TCPConnection 必须至少返回一个 TCP 包作为回复,以告知远程终端 此时的 ackno 和 window size。

  • 如果接收到的 TCP 数据包包含的 seqno 是无效的,则 TCPConnection 也需要回复一个类似的无效数据包。这是因为远程终端可能会发送无效数据包以确认当前连接是否有效,同时查看此时接收方的 ackno 和 window size。这被称为 TCP 的 keep-alive

    1
    2
    3
    COPYif (_receiver.ackno().has_value() && seg.length_in_sequence_space() == 0 && seg.header().seqno == _receiver.ackno().value() - 1) {
    _sender.send_empty_segment();
    }

对于发送数据段来说:

  • 当 TCPSender 将一个 TCPSegment 数据包添加到待发送队列中时,TCPConnection 需要从中取出并将其发送。
  • 在发送当前数据包之前,TCPConnection 会获取当前它自己的 TCPReceiver 的 ackno 和 window size,将其放置进待发送 TCPSegment 中,并设置其 ACK 标志。

TCPConnection 需要检测时间的流逝。它存在一个 tick 函数,该函数将会被操作系统持续调用。当 TCPConnection 的 tick 函数被调用后,它需要

  • 告知 TCPSender 时间的流逝,这可能会让 TCPSender 重新发送被丢弃的数据包
  • 如果连续重传次数超过 TCPConfig::MAX RETX ATTEMPTS,则发送一个 RST 包。
  • 在条件适合的情况下关闭 TCP 连接(当处于 TCP 的 TIME_WAIT 状态时)。

TCP 连接的关闭稍微麻烦一些,主要有以下几种情况需要考虑:

  • 接收方收到 RST 标志或者发送方发送 RST 标志后,设置当前 TCPConnection 的输入输出字节流的状态为错误状态,并立即停止退出。这种属于暴力退出(unclear shutdown),可能会导致尚未传输完成的数据丢失(例如仍然在网络中运输的数据包在接收方收到RST标志后被丢弃)。

  • 若想让双方都在数据流收发完整后退出(clear shutdonw),则情况略微麻烦一点。先上张四次挥手的图:
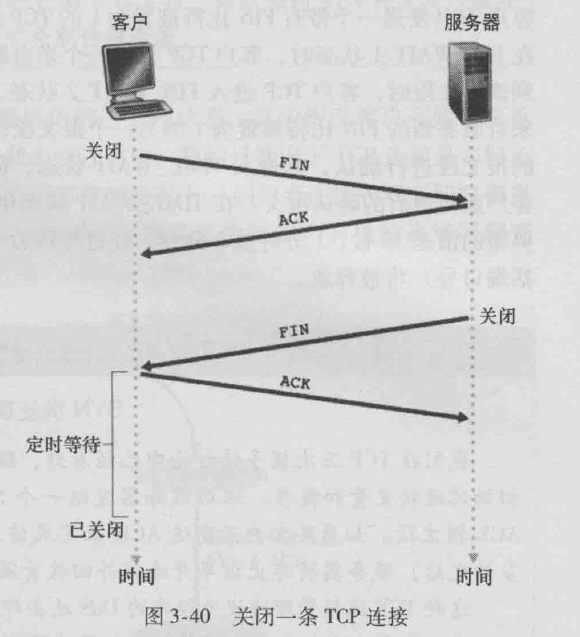
    img

    简单讲下挥手的流程:

    • 客户端的数据全部发送完成,则将会发送 FIN 包以告知服务器 客户端数据全部发送完成(发送完成,不等于被接收完成)。但请注意,此时的服务器仍然可以发送数据至客户端。

    • 当服务器对 客户端的 FIN 进行 ack 后,则说明服务器确认接收客户端的全部数据

    • 服务器继续发送数据,直到服务器的数据已经全部发送完成,则向客户端发送 FIN 包以告知服务端数据全部发送完成

    • 当客户端对服务端的 FIN 发送 ack 后,则说明客户端确认接收服务端的全部数据。注意,此时客户端可以确认:

      • 服务端成功接收客户端全部数据
      • 客户端成功接收服务端的全部数据

      此时客户端可以百分百相信,此时断开连接对客户端是没有任何危害的

      但是!当服务器没接收到 客户端的 ACK 时,

      • 服务器可以确认它成功接收客户端全部数据
      • 服务器不知道客户端是否成功接收服务端的全部数据

      也就是说,服务器一定要获得到客户端的 ACK 才能关闭。

      若服务器在超时时间内没获得到客户端的 FIN ACK,则会重发 FIN 包。但假如此时客户端已经断连,那么服务器将永远无法获取到客户端的 FIN ACK。因此即便客户端已经完成了它的所有任务,它仍然需要等待服务器端一小段时间,以便于处理服务端的 FIN 包。

      当服务器获取到了客户端的 FIN_ACK 后,它就直接关闭连接。而客户端也会在超时后静默关闭。此时双方均成功获取对方的全部数据,没有造成任何危害。

      这里有个很重要的点是,TCP 不会对 ACK 包来进行 ACK。例如服务端不会对客户端发来的 FIN_ACK

分析

常见的返回值,直接调用receiver或者sender得到,或者自己加入这个值

[CS144] Lab 4: The TCP connection_cs144 lab4 tcpconnection实现笔记_PeakCrosser的博客-CSDN博客

1
2
3
4
5
6
7
8
9
10

size_t TCPConnection::remaining_outbound_capacity() const { return _sender.stream_in().remaining_capacity(); }

size_t TCPConnection::bytes_in_flight() const { return _sender.bytes_in_flight(); }

size_t TCPConnection::unassembled_bytes() const { return _receiver.unassembled_bytes(); }

size_t TCPConnection::time_since_last_segment_received() const { return _time_since_last_segment_received; }

bool TCPConnection::active() const { return _active; }

首先还是先用trick函数来实现,void TCPConnection::tick(const size_t ms_since_last_tick) ,这个传入的是时间,我们需要用这个歌时间,进行更新sender的trick,还有更新,上次接受到的时间片段。如果经过这个sender的trick,定时器重传次数超时了,我们就需要关闭这个连接,使用rst的方式关闭连接。如果是正常关闭,那就设置active为false就行,然后发送segment

对于发送数据段来说:

  • 当 TCPSender 将一个 TCPSegment 数据包添加到待发送队列中时,TCPConnection 需要从中取出并将其发送。
  • 在发送当前数据包之前,TCPConnection 会获取当前它自己的 TCPReceiver 的 ackno 和 window size,将其放置进待发送 TCPSegment 中,并设置其 ACK 标志。

参照上面的思路,我们需要做的就是,从sender里面的发送队列选择seg,然后,加入ackno,来作为发送的标识(这个是receiver)里面进行得到,最后就是设置窗口大小,然后放入到connection的发送队列里面

主要功能就是从sender取值,然后装配ack,之后放入到connection的

  1. sender获取seg
  2. receiver获取ackno进行装配
  3. 放入到connection得到发送队列里面
1
2
3
4
5
6
7
8
9
10
11
12
13
14
15
16
17
18
19
void TCPConnection::send_segments() {
while (!_sender.segments_out().empty()) {
TCPSegment segment = _sender.segments_out().front();
_sender.segments_out().pop();
optional<WrappingInt32> ackno = _receiver.ackno();
// if TCP does not receive SYN segments from the remote peer, i.e. at SYN_SENT state
// TCP will not set ACK flag and seqno
if (ackno.has_value()) {
segment.header().ack = true;
segment.header().ackno = ackno.value();
}
// set the local receiver's window size
segment.header().win = _receiver.window_size() <= numeric_limits<uint16_t>::max()
? _receiver.window_size()
: numeric_limits<uint16_t>::max();
_segments_out.emplace(segment);
}
}

下面实现connect这个,这个代码只会在刚开始建立连接的时候才是用,我们的作用就是发送数据到sender,然后connection从sender进行取值

1
2
3
4
5
void TCPConnection::connect() {
_sender.fill_window();
send_segments();
}

write() 方法

该方法即上层应用向 TCP 的字节流中写入数据进行发送.写数据

调用sender的byte进行写入数据

1
2
3
4
5
6
7
8
9
10
size_t TCPConnection::write(const string &data) {
if (!_active) {
return 0;
}
size_t ret = _sender.stream_in().write(data);
_sender.fill_window();
send_segments();
return ret;
}


对于接收数据段而言:

  • 如果接收到的数据包设置了 RST 标志,则将输入输出字节流全部设置为 错误 状态,并永久关闭 TCP 连接。

  • 如果没有收到 RST 标志,则将该数据包传达给 TCPReceiver 来处理,它将对数据包中的 seqno、SYN、payload、FIN 进行处理。

  • 如果接收到的数据包中设置了 ACK 标志,则向当前 TCPConnection它自己的 TCPSender 告知远程终端的 ackno 和 window_size。

    这一步相当重要,因为数据包在网络中以乱序形式发送,因此远程发送给本地的 ackno 存在滞后性。

    将远程的 ackno 和 window size 附加至发送数据中可以降低这种滞后性,提高 TCP 效率。

  • 如果接收到的 TCP 数据包包含了一个有效 seqno,则 TCPConnection 必须至少返回一个 TCP 包作为回复,以告知远程终端 此时的 ackno 和 window size。

  • 如果接收到的 TCP 数据包包含的 seqno 是无效的,则 TCPConnection 也需要回复一个类似的无效数据包。这是因为远程终端可能会发送无效数据包以确认当前连接是否有效,同时查看此时接收方的 ackno 和 window size。这被称为 TCP 的 keep-alive

那句上面的介绍,我们知道connection的接送流程是什么。

  1. 判断是不是rst,是就设置rxt,然后直接非正常关闭
  2. 不是就交给receiver处理,使用receiver的segment-receiver(得到index,还有数据交给重组器进行处理)
  3. 同事这个接受端如果设置ack,就要交给sender进行处理,这样构成tcp可靠传输,更新窗口
  4. 同时接收到欧晓的seqno,就需要我们进行返回我们的窗口大小
  5. 如果无效,发送一个空的seg

end_input_stream() 方法

该方法即结束需要发送的数据流, 即出站流. 因此需要调用 _sender.steam_in().end_input() 方法. 而结束流的隐含信息是要发送一个 FIN 报文段,

sender的作用就是进行发送byte—stream的数据,所以我们首先进行设置byte-stream为结束状态,然后调用这个fill,进行发送fin挥手包,最后还是需要发送到connection的

(只要使用fill-windows,就一定要进行发送到connection

1
2
3
4
5
6
void TCPConnection::end_input_stream() {
_sender.stream_in().end_input();
_sender.fill_window();
send_segments();
}

1
2
3
4
5
6
7
8
9
10
11
12
13
14
15
16
17
18
19
20
21
22
23
24
25
26
27
28
29
30
31
32
33
34
35
36
37
38
39
40
41
42
43
44
45
46
47
48
49
50
51
52
53
54
void TCPConnection::segment_received(const TCPSegment &seg) {
_time_since_last_segment_received_ms = 0;
// 如果发来的是一个 ACK 包,则无需发送 ACK
bool need_send_ack = seg.length_in_sequence_space();
// 读取并处理接收到的数据
// _receiver 足够鲁棒以至于无需进行任何过滤
_receiver.segment_received(seg);

// 如果是 RST 包,则直接终止
//! NOTE: 当 TCP 处于任何状态时,均需绝对接受 RST。因为这可以防止尚未到来数据包产生的影响
if (seg.header().rst) {
_set_rst_state(false);
return;
}

// 如果收到了 ACK 包,则更新 _sender 的状态并补充发送数据
// NOTE: _sender 足够鲁棒以至于无需关注传入 ack 是否可靠
assert(_sender.segments_out().empty());
if (seg.header().ack) {
_sender.ack_received(seg.header().ackno, seg.header().win);
// _sender.fill_window(); // 这行其实是多余的,因为已经在 ack_received 中被调用了,不过这里显示说明一下其操作
// 如果原本需要发送空ack,并且此时 sender 发送了新数据,则停止发送空ack
if (need_send_ack && !_sender.segments_out().empty())
need_send_ack = false;
}

// 如果是 LISEN 到了 SYN
if (TCPState::state_summary(_receiver) == TCPReceiverStateSummary::SYN_RECV &&
TCPState::state_summary(_sender) == TCPSenderStateSummary::CLOSED) {
// 此时肯定是第一次调用 fill_window,因此会发送 SYN + ACK
connect();
return;
}

// 判断 TCP 断开连接时是否时需要等待
// CLOSE_WAIT
if (TCPState::state_summary(_receiver) == TCPReceiverStateSummary::FIN_RECV &&
TCPState::state_summary(_sender) == TCPSenderStateSummary::SYN_ACKED)
_linger_after_streams_finish = false;

// 如果到了准备断开连接的时候。服务器端先断
// CLOSED
if (TCPState::state_summary(_receiver) == TCPReceiverStateSummary::FIN_RECV &&
TCPState::state_summary(_sender) == TCPSenderStateSummary::FIN_ACKED && !_linger_after_streams_finish) {
_is_active = false;
return;
}

// 如果收到的数据包里没有任何数据,则这个数据包可能只是为了 keep-alive
if (need_send_ack)
_sender.send_empty_segment();
_trans_segments_to_out_with_ack_and_win();

}

总体流程如下

  1. 检测是不是还不是alive
  2. 检查是不是rst
  3. 接下来看,是不是刚开始建立绘画的ack状态,(没有ackno还有next发送的,刚开始进行建立)
  4. 之后就是receiver接受这个seg,同事如果有ack,那么sender也需要进行校验
  5. 如果是刚建立的,那么还是需要进行发送fill_windows作为返回放入到sender的发送器
  6. 如果自己的发送器还有接收器都为空,那么就说明彻底结束,不需要继续keep alive
  7. 如果接收到的 TCP 数据包包含的 seqno 是无效的,则 TCPConnection 也需要回复一个类似的无效数据包,返回处理特殊情况
1
2
3
4
5
6
7
8
9
10
11
12
13
14
15
16
17
18
19
20
21
22
23
24
25
26
27
28
29
30
31
32
33
34
35
36
37
38
39
40
41
42
43
44
45
46
47
48
49
50
51
52
void TCPConnection::segment_received(const TCPSegment &seg) {
if (!_active) {
return;
}
// reset the timer
_time_since_last_segment_received = 0;
const TCPHeader &header = seg.header();
// if TCP does not receive SYN from remote peer, and not send SYN to remote peer
if (!_receiver.ackno().has_value() && _sender.next_seqno_absolute() == 0) {
// at this time, TCP acts as a server,
// and should not receive any segment except it has SYN flag
if(!header.syn) {
return;
}
_receiver.segment_received(seg);
// try to send SYN segment, use for opening TCP at the same time
connect();
return;
}
// the TCP ends in an unclean shutdown when receiving RST segment
if (header.rst) {
unclean_shutdown();
return;
}
_receiver.segment_received(seg);
// if TCP sends SYN segment as a client but does not receive SYN from remote peer,
// the local TCP should not handle it, too.
if (!_receiver.ackno().has_value()) {
return;
}

// set the `_linger_after_streams_finish` the first time the inbound stream ends
if (!_sender.stream_in().eof() && _receiver.stream_out().input_ended()) {
_linger_after_streams_finish = false;
}
// use the remote peer's ackno and window size to update the local sending window
if (header.ack) {
_sender.ack_received(header.ackno, header.win);
}

_sender.fill_window();
// makes sure that at least one segment is sent in reply
if (seg.length_in_sequence_space() > 0 && _sender.segments_out().empty()) {
_sender.send_empty_segment();
}
// an extra special case to respond to a keep-alive segment
if (seg.length_in_sequence_space() == 0 && header.seqno == _receiver.ackno().value() - 1) {
_sender.send_empty_segment();
}
send_segments();
}

最后一个就是关闭,分为正常操作,还有不正常。正常直接就是不在activate活跃,不正常全部进入error状态

下面是正常关闭

TCP 的正常关闭即 TCP 的四次挥手, 是本实验中最为复杂的地方, 其中也有笔者不是很确定的地方.
TCP 正常关闭的四个前提已经在 #要点 中提到, 如下即前提与代码的对应:

Prereq#1: _receiver.unassembled_bytes()==0 && _receiver.stream_out().input_ended(), 实际上可以直接转化为 _receiver.stream_out().input_ended()(此处使用 _receiver.stream_out().eof() 方法同样能通过测试, 任务指导中描述使用的 ended, 因此这里笔者选择了前者).
Prereq#2: _sender.stream_in().eof(). 这里需要是 eof() 方法而非 input_ended(), 因为要确保发送字节流的所有数据已经全部发送出去.
Prereq#3: _sender.bytes_in_flight()==0

主要就是发送器为eof,接收器为eof,然后还没有没被确认的byte

1
2
3
4
5
6
// TCP clean shutdown
if (_receiver.stream_out().input_ended() && _sender.stream_in().eof() && _sender.bytes_in_flight() == 0 && (!_linger_after_streams_finish || _time_since_last_segment_received >= 10 * _cfg.rt_timeout)) {
_active = false;
return;
}

不正常的关闭就是设置为error,然后也是关闭

1
2
3
4
5
6
inline void TCPConnection::unclean_shutdown() {
_sender.stream_in().set_error();
_receiver.stream_out().set_error();
_active = false;
}

最后一个就是rst,这个作用就是封装的时候,我们从sender里面提取的seg加入一个rst标志位,然后再次调用connection的发送代码来进行发送。

1
2
3
4
5
6
7
8
9
10
11
12
13
14
15
16
17
18
19
20
21
void TCPConnection::send_RST() {
_sender.fill_window();
if (_sender.segments_out().empty()) {
_sender.send_empty_segment();
}
TCPSegment segment = _sender.segments_out().front();
_sender.segments_out().pop();
optional<WrappingInt32> ackno = _receiver.ackno();
if (ackno.has_value()) {
segment.header().ack = true;
segment.header().ackno = ackno.value();
}
segment.header().win = _receiver.window_size() <= numeric_limits<uint16_t>::max()
? _receiver.window_size()
: numeric_limits<uint16_t>::max();
segment.header().rst = true;
_segments_out.emplace(segment);

unclean_shutdown();
}


整体代码

1
2
3
4
5
6
7
8
9
10
11
12
13
14
15
16
17
18
19
20
21
22
23
24
25
26
27
28
29
30
31
32
33
34
35
36
37
38
39
40
41
42
43
44
45
46
47
48
49
50
51
52
53
54
55
56
57
58
59
60
61
62
63
64
65
66
67
68
69
70
71
72
73
74
75
76
77
78
79
80
81
82
83
84
85
86
87
88
89
90
91
92
93
94
95
96
97
98
99
100
101
102
103
104
105
106
107
108
109
110
111
112
113
114
115
116
117
118
119
120
121
122
123
124
125
126
127
128
129
130
131
132
133
134
135
136
137
138
139
140
141
142
143
144
145
146
147
148
149
150
151
152
153
154
155
156
157
158
159
160
161
162
163
164
165
166
167
168
169
170
171
172
173
174
175
176
177
178
#include "tcp_connection.hh"

#include <iostream>

// Dummy implementation of a TCP connection

// For Lab 4, please replace with a real implementation that passes the
// automated checks run by `make check`.

template <typename... Targs>
void DUMMY_CODE(Targs &&.../* unused */) {}

using namespace std;

size_t TCPConnection::remaining_outbound_capacity() const { return _sender.stream_in().remaining_capacity(); }

size_t TCPConnection::bytes_in_flight() const { return _sender.bytes_in_flight(); }

size_t TCPConnection::unassembled_bytes() const { return _receiver.unassembled_bytes(); }

size_t TCPConnection::time_since_last_segment_received() const { return _time_since_last_segment_received; }

void TCPConnection::segment_received(const TCPSegment &seg) {
if (!_active) {
return;
}
// reset the timer
_time_since_last_segment_received = 0;
const TCPHeader &header = seg.header();
// if TCP does not receive SYN from remote peer, and not send SYN to remote peer
if (!_receiver.ackno().has_value() && _sender.next_seqno_absolute() == 0) {
// at this time, TCP acts as a server,
// and should not receive any segment except it has SYN flag
if (!header.syn) {
return;
}
_receiver.segment_received(seg);
// try to send SYN segment, use for opening TCP at the same time
connect();
return;
}
// the TCP ends in an unclean shutdown when receiving RST segment
if (header.rst) {
unclean_shutdown();
return;
}
_receiver.segment_received(seg);
// if TCP sends SYN segment as a client but does not receive SYN from remote peer,
// the local TCP should not handle it, too.
if (!_receiver.ackno().has_value()) {
return;
}

// set the `_linger_after_streams_finish` the first time the inbound stream ends
if (!_sender.stream_in().eof() && _receiver.stream_out().input_ended()) {
_linger_after_streams_finish = false;
}
// use the remote peer's ackno and window size to update the local sending window
if (header.ack) {
_sender.ack_received(header.ackno, header.win);
}

_sender.fill_window();
// makes sure that at least one segment is sent in reply
if (seg.length_in_sequence_space() > 0 && _sender.segments_out().empty()) {
_sender.send_empty_segment();
}
// an extra special case to respond to a keep-alive segment
if (seg.length_in_sequence_space() == 0 && header.seqno == _receiver.ackno().value() - 1) {
_sender.send_empty_segment();
}
send_segments();
}

bool TCPConnection::active() const { return _active; }

size_t TCPConnection::write(const string &data) {
if (!_active) {
return 0;
}
size_t ret = _sender.stream_in().write(data);
_sender.fill_window();
send_segments();
return ret;
}

//! \param[in] ms_since_last_tick number of milliseconds since the last call to this method
void TCPConnection::tick(const size_t ms_since_last_tick) {
if (!_active) {
return;
}
_time_since_last_segment_received += ms_since_last_tick;
_sender.tick(ms_since_last_tick);
// TCP unclean shutdown if the number of consecutive retransmissions
// is more than an upper limit
if (_sender.consecutive_retransmissions() > TCPConfig::MAX_RETX_ATTEMPTS) {
send_RST();
return;
}
// TCP clean shutdown if necessary
if (_receiver.stream_out().input_ended() && _sender.stream_in().eof() && _sender.bytes_in_flight() == 0 &&
(!_linger_after_streams_finish || _time_since_last_segment_received >= 10 * _cfg.rt_timeout)) {
_active = false;
return;
}
// send segments when `_sender.tick()` has a retransmission
send_segments();
}

void TCPConnection::end_input_stream() {
_sender.stream_in().end_input();
_sender.fill_window();
send_segments();
}

void TCPConnection::connect() {
_sender.fill_window();
send_segments();
}

TCPConnection::~TCPConnection() {
try {
if (active()) {
cerr << "Warning: Unclean shutdown of TCPConnection\n";

// Your code here: need to send a RST segment to the peer
send_RST();
}
} catch (const exception &e) {
std::cerr << "Exception destructing TCP FSM: " << e.what() << std::endl;
}
}

void TCPConnection::send_segments() {
while (!_sender.segments_out().empty()) {
TCPSegment segment = _sender.segments_out().front();
_sender.segments_out().pop();
optional<WrappingInt32> ackno = _receiver.ackno();
// if TCP does not receive SYN segments from the remote peer, i.e. at SYN_SENT state
// TCP will not set ACK flag and seqno
if (ackno.has_value()) {
segment.header().ack = true;
segment.header().ackno = ackno.value();
}
// set the local receiver's window size
segment.header().win = _receiver.window_size() <= numeric_limits<uint16_t>::max()
? _receiver.window_size()
: numeric_limits<uint16_t>::max();
_segments_out.emplace(segment);
}
}

void TCPConnection::send_RST() {
_sender.fill_window();
if (_sender.segments_out().empty()) {
_sender.send_empty_segment();
}
TCPSegment segment = _sender.segments_out().front();
_sender.segments_out().pop();
optional<WrappingInt32> ackno = _receiver.ackno();
if (ackno.has_value()) {
segment.header().ack = true;
segment.header().ackno = ackno.value();
}
segment.header().win = _receiver.window_size() <= numeric_limits<uint16_t>::max() ? _receiver.window_size()
: numeric_limits<uint16_t>::max();
segment.header().rst = true;
_segments_out.emplace(segment);

unclean_shutdown();
}

inline void TCPConnection::unclean_shutdown() {
_sender.stream_in().set_error();
_receiver.stream_out().set_error();
_active = false;
}

总结

这一届主要是实现如何建立连接,在两个对等节点之间。我们调用之前实现的sender还有receiver来进行处理。这一节的边界条件太多,直接参考的别人的实现。

主要实现的功能就是发送还有接受

connection的发送功能就是从sender里面获取seg,然后进行封装ack来发送,放入到自己的connection的队列

connection的接受功能就比较多,建立会话联系,1.刚开始建立syn的时候收到seg,这个歌时候要看他有没有syn标识,有就直接交给receiver处理,因为这个时候不需要进行校验ack,保证tcp的完整性。2.如果是rst错误,直接不安全的关闭连接。3.普通的seg,来确保收到的正确,这个时候就需要receiver还有sender,receiver手机seg,sender使用ackno更新窗口还有确认之前发送的已经到达,之后还需要发送自己文件,sender使用fill-windows来发送。最后是特殊条件,还有放入到sender队列里面,这个时候,就需要connection进行发送。

trick的功能

  1. 更新sender里面的定时器
  2. 然后超时设置rst
  3. 之后就是接着发送send(因为重传,可能会放入新的seg到sender的队列里面)

剩下的就是普通的代码,可以直接返回的。

总体来说,这个代码还是非常难得。不像xv6那种有提示,这个代码的提示基本没有,操作说明说了和没有说一样,只能按照别人已经实现了的代码,来倒退这个函数到底是要干什么。这几个la做完,的确对tcp的可靠传输,还有拥塞控制有了更一步的了解。主要的是还是要参考,下面2张图。

知道sender,还有receiver的底层

img

然后重组器的实现机制,和发送器能发送的窗口。

  1. 重组器的next就是第一个没有assemble的
  2. 发送器的窗口大小是ack+windows—next,ack是第一个还没有读入到的,绿色的就是没有确认的

image-20211107124153476